Wednesday, July 29, 2015

Reese's Heart Book

Reese's Heart Book. A nice big display of the fun insides above.

Years ago I kept a box and bag from Valentine's Day goodies, my plans were to create a book with them because I loved the heart window in the box so much. The theme was to be for chocolate lovers, even without a date, chocolate is always a friend. :P

My base pages were made from cereal boxes that I painted with white gesso. Originally I was going to paint the surface directly, but changed my mind later and used scrapbook paper. I also added in brown paper later on, collecting materials for the book in time.
Left is the spine which is what some would call a hidden spine I think...I made a base spine, sewed my signatures to it, then glued yellow paper over it to hide the stitches. I had to extend the spine size from my original idea since cereal box pages do create their own bulk. I also added pretty gold ribbon to match, glued under parts of the cover.
The charms were a fun experiment. I used some beads and gold chain on hand, hung red and silver gold beads from it, made a paper locket charm and wax seal from red paper that I glazed then embossed on with black and transparent powder. I added some dimensional magic to my heart charm for some shine. The chocolate bar was really fun, made from wall protector pads you stick on picture frames, backed with part of a brown cereal box, wrapped with gold ribbon and completed with my paper heart seal. The final domino charm (as I call it) was made by glazing black paper, embossing on a picture of chocolates in a heart box with the words "sweet" and "love". The sparkly red side was my first attempt, the powder was a bit harder to deal with. After I made my paper pieces, I laminated them, added them to four layers of cereal box tabs, inked black on the edges, then drilled a hole for the jump ring. All objects were added with jump rings, and I poked a hole at the top of the spine to attach the full dangle.
The inside, I really love that black paper with gold metallic. The chocolate page is from the sweets stack.
Used some scrapbook paper, stenciled on some words and inked it with jell pen.
Made tags with scrap pieces of paper and ribbon, and hand stenciled, then embossed my sparkly heart paper. Speaking of which, it's true you can use materials on hand. Don't have papers that match your theme? Try making some of  your own with what you have (it just takes a tone of work to hand stamp and emboss everything like I did).
A hidden heart.
Simple love note, made from scraps of cut out when I made the cover.
I loved making these tuck spots that look like giant peanut butter cup halves. All I did was take sparkly silver paper and textured brown paper, used a compass to make a circle, one size smaller than the other, cut out the silver wrapper with deckled edge craft scissors, glued my pieces together, cut them in half, then stuck the edges of them to my pages with double stick tape.
One of my middle pockets made of printer paper and elements from the box.
Some hidden bag tags from the second pocket.
A peanut butter tuck spot with mini tags and more hand stenciled/embossed paper.

One of the scrap tags (left) with it's simple diamond shape.
And finally the back of the book with more of that oh so pretty metallic paper.
 
 Of course there's always more to see in the video. ^.~

Monday, July 20, 2015

Reese's Heart Book-sneak peek

 Diving back into a started project from many years ago. This is a sneak peek of what's to come.
Some elements are scrapbook paper and assembled elements like peanut butter cups in a silver wrapper.
And the rest was a pain, hand stenciling, stamping, and embossing pages to create my own color matching textures for the book.
I did so much embossing today that I was tired of it. But I'll admit with chosen plain colors and a little embossing, I'm challenging myself to use what I have on hand to make papers of matching theme and not go off to the store to find another paper stack.
 Though the embossing is a bit messy, I guess it adds character.
I also have some plain stamped paper. Stay tuned for the finished project.

Reed's Candy Box Book

Been working on this for half the week. Making journals in a relaxed fashion, not worrying about what I'm going to use it for and just making it has helped me move along.
This Reed's candy box for ginger chews has been sitting on the top of my paper drawers forever, collecting dust. I always considered using it for something and finally got tired of it just sitting there, so I made it my next book project, a true mini.

This project also helped me find ways of using a few things in my stash, like the flip flop ribbon. I finally got to use a bit of it on the book to match that warm, tropical label.
The book measures approximately 2 1/4'' x 3'' with a total of 4 signatures. Made from a Reed's ginger candy box, yellow parchment paper, green graph paper, tracing graph paper, security envelopes, ribbon, and brads. Contains 21 pockets and tuck spots, plus tags.
I only had to use one sheet of each paper to make all my signatures with only a few security envelope halves for interest.

I used different kinds of ribbons from the craft drawers for my tags, and am super glad I had a stencil to make all those tags (excluding the three mini tags). I had to make a stencil for those.

Here's a thing I learned and made mistakes three times before getting it right. While sewing your signatures into the paper backing that glues to the cover along the spine, make sure all your signatures are sewn in the right direction. I felt like a dingbat when I realized I sewed by first signature in upside down, which means the pockets were on the top of the page. I had to go back and resew my pages in. Second mistake, always remember your signatures are facing the right direction before gluing everything down.....I glued mine to the cover and found my pages were upside down and backwards in the book. Thankfully my cheap letter opener helped pry under the partially wet glued papers again so I could correct my mistake. Once all was glued in properly, I added my inner cover papers and some washi tape.

 
As usual, here's a flip through of the book.

Blue Tech Junk Journal

Journal making has been so much fun. I've been waiting forever to be part of the Junk Journal Junkies group on Facebook and finally my request was accepted, this being several weeks ago. Later I might write an article about my experience so far, but in short terms being part of the community has made me more motivated in making my journals and sharing them with other artists who do the same stuff.
As all of it goes, I'm determined to use up what I have in my stash. The material has piled up severely for such a tiny corner, and I strive to pile books where materials now sit.

There's been a lot in my stash which I've been saving for the right book, never able to settle on what kind of book I wanted, but noticed I have lots of tech based material, and interesting headphone packaging which didn't fit the size of my Juke Box book's dimensions. With this noted, I settled on making a tech book for holding all things tech based that I use and like. I sort of just rummaged and threw in materials that seemed appropriate with the theme.
My materials range from headphone packaging, to laptop and electrical device packaging, with extra things like scrap math paper sheets, junk mail envelopes, a few plain papers with decorative accents made with pattern scissors or punches, and a number of other materials were used to match the theme. I did use quite a few scraps for this project, hence a chunky book that hasn't even been filled with journaling and ephemera yet.
I thought of multiple ways to use up more scraps sitting around to match the theme, and part of the chunkiness in the book comes from having a mini book tucked inside one of the pockets. I loved making the inner covers and using the cloth material from laptop packaging for the outside.

My first idea for the black cloth with recycle symbols on it was to make it into a pocket for the large book, but then I thought about how well cloth works for other things, and realized how it could serve better as a book cover. This is when I decided to make a smaller book to stick inside the larger one, and still match the tech theme.

I think I enjoyed the process of sewing this mini book almost more than binding the main book with O wires. I especially enjoyed stamping and embossing the inner covers displayed above. Because I didn't have paper long enough to fit the cloth as I wanted it to, I used creative methods of using two 8.5 x 11'' sheets of paper, one serving as the center of the book. The other I cut down the center and glued to either side at desired extension, gluing them on to form pockets. After my signature was sewn to the base cover, I applied double sided tape and stuck the fabric outside down, covering up my stitches and making a fun little book.

 
 Here's the video flip through of the project. In the future I might add charms and dangles on the wire spine, and fill the book with fun tech subjects. Till then, enjoy.

Smoked Salmon Junk Journal

Smoked salmon boxes made into a junk journal. I've been saving the boxes for years, stashed them away every time we finished off a smoked salmon with cream cheese and crackers. We would get them every now and then when they were available at our local Big Lots store, but the price for one is outrageous even in discount...

The packaging style of the company changes over time. It went from being the basic fish you see on the pages within the book, to being the more adult looking fish on the outside cover of the book, suddenly to change to the style of the first page of the book which you can see in the lower left bottom corner of the panel above. By personal taste, I liked the cover of the adult fish most, and that was the only one made of thicker cardboard, making it perfect as a cover.

I had been collecting bits and ends of stuff through time, saving even the smaller scrap pieces from the salmon boxes which I had to cut down to size. All of the scraps served well as accents and add ins to the book once I sat down to make it. You'll notice the tabs on certain tags and decorative strips on little add ins and pockets were all scrap pieces from the boxes.
Recently I got a few sheets of camping themed paper specifically for this project, helped add some interest to the theme which started as an emotion and yearning for the great outdoors. That's right, I made the book according to my mood, wanting to be near clean, flowing waters, surrounded by trees and fresh air. The Alaskin, mountain, camping theme was further inspired by the television show "Twin Peaks" (a rather quirky mystery series that takes place somewhere in Washington). The book basically reflects my longing to go on an adventure, and possibly do some fishing. :P

I was giddy when I found I had so many small things that fit the project; the only challenging part was stenciling papers to fit the theme. I wanted water waves and wood grain, but found painting with stencils isn't as easy at it looks. What papers I did make I used, and what I didn't use I'll be using in a possible second smoked salmon book. The benefit of stenciling my own papers is that I got to experiment with different kind of mediums; everything from paint, chalk pastel, and homemade brown ink spritz. Some of the experiments were added to this book for fun.

The fun bits added on, range from food nets to serve as fish nets, a little washi tape, a salmon can label, and the dangles of stuff on the spine. I used red and blue yarns of different kinds, the army twine key chain was made by my brother, the torn black net was from the net bag I used for pockets in the book, the clear hook was a hanger from sock packaging, the black hanger hook displayed in the top middle of the panel was a panty hose hanger, and the buoy was an extra thing that I can't recall origin of, I just found it interesting and kept it in my collection of nick knacks, thrilled to have finally used it for something so fitting. The beaded end was added to look like water drops, and to prevent the thread from coming loose.

Tips, I used scrapbook paper to cover the insides of the book, the edges of the cover and some of the elements within were distressed with a red or blue ink pad, and the paper of the cover was sealed with Liquitex gloss varnish.


The thing that really made the book if you ask me are these fun fish cards I assembled as print outs using old fish images from Graphics Fairy. The postcards are simple obviously, the other ones I put together so you can score down the center where they connect, fold, then cut out for a double sided note fish. For those who think these look fun, I've included the assembled pages above for printing.

s
 Yes, I've even made a video flip through. What would a journal post be without a flip through? Have fun watching, be inspired, and remember that ideas can come from anywhere. :)
 
A final fun thing, I would purposely plan a trip around a book just so I could fill it with a fitting event. :P

Neon City Junk Journal

 
Neon City junk journal; it's creation was a result of my mind reflecting on an old comic book idea, having some headphone packaging I liked the color and brand of (I go through a lot of headphones), and having a craft corner with supplies that's getting out of hand.

I wanted to use up at least some scrap papers and get my corner cleaned up (a work in progress), and I wanted to get my favorite headphone boxes out of the way. At first I was going to make a city themed book of random material revolving around music, clothing stores, night themes, dark colors with bright colors to represent city lights....but then the idea took a different turn.

My first 9x12 cover was decorated using a Victoria's Secret bag. The hot pink with white letters seemed to fit the city theme at first, but then I decided I might want to use that cover for a fashion album, so I decided to make a new cover slightly bigger than a MEAD book (I've always loved the size of MEAD books). I had my decent sized pile of junk for this book collected, and during the time of making it I had been in a big mood for neon colors on black, dreaming about the mythical world of Neon City which is based around music and androids. I considered the idea of making my own scrapbook papers based around the theme.

This journal ended up being the prototype of that dream, and I just slipped that small theme in to add interest to my cover. I used two pizza boxes, two different shades of black scrapbook paper, three main shades of scrapbook paper as my color scheme for the entire book, silver embossing, letter stenciling, and neon jell pens to match the color scheme. These basic materials were used to make the cover, the longest process being the hand crafted record images which I hand painted with emboss glue, added the paper centers, punched holes, then cut them in half and added them to the book.

The final step to make the colors of the cover really pop was to paint it with two layers of Liquitex gloss varnish. It gave it that pretty sheen like a shiny record, which is what I wanted.

Note, the front and back covers align with each other image wise when laid out flat and side by side, but you can't really tell once the book is bound.
After the cover I made pockets and punched holes with my bind it all, using all junk material, not even reaching for scrapbook papers since there weren't really any I had that would match the color scheme. Then I remembered this old neon notebook I got from a yard sale, and decided to use a few sheets of paper from it in the book. These striped papers, to me, made the book, and also helped me settle with categorizing the sections of the book according to color scheme. So we go form yellow green, pink, then orange.

Final step was binding the book with some old wires I had from another book, and adding an old neon green yoyo string as a closure.


Here's a video flip through of the book. Have fun, be inspired. ^.~

A learning experience. Did you know that I was unaware that the scanner couldn't pick up on neon colors? I'm told it's because the shades are so close to the spectrum of light that it's hard for a digital device to pick up on it. Image above is what the scanner made my cover look like. Pink became purple, and green became teal. 

Capturing the colors with a camera was equally tricky, but more successful than a scanner. To me, neon colors are truly amazing, so bright only our eyes can see their true shade.

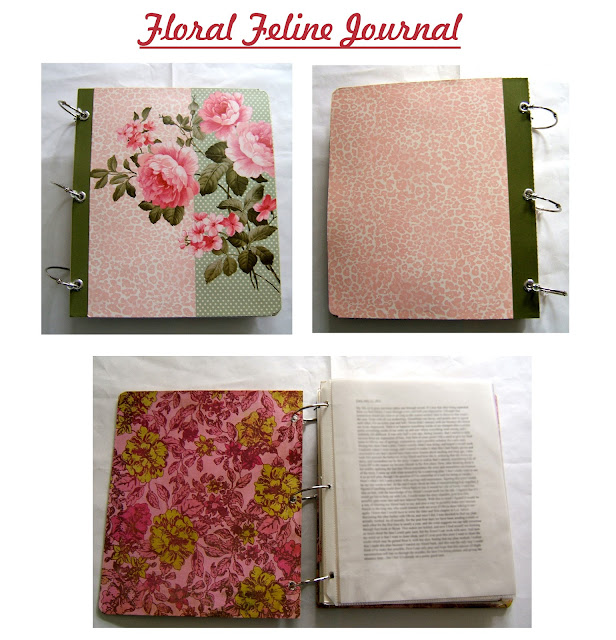
Floral Feline File Folder- 2014 Journal Cover

Yay! This makes me happy. I've had my heart set on using an old file folder, kept in my pile of paper, as part of a book cover for my 2014 journal. The folder had been boogered on the edges, so I cut those parts away, then I layered some thin cardboard together, lined the edges with polka dotted washy tape, added some green to the spine edges, and last on the project added some large eyelets to cover up the rough holes caused by drilling (a necessary step to get through cardboard). I must say I really like the look of the eyelets, made it so much better to look at. Front cover (left) Back cover (right)

I faced a few hick ups with the inner cover. Originally I used flat pink scrapbook paper, but then found the covers stuck together during drying, and ripped (my fault for not knowing they weren't fully dry and moving them too soon...oops). I was naturally disappointed, but snagged a chance to go to A.C. Moore, and found a paper which made me happy. Though it was more on the purple pink side, I didn't mind, and tried a second time to add the paper over my mistake. It was a success, and it makes me much happier to look at than flat pink (yay for mistakes leading to better things). ^.^

In the near future I may do a flip through of my journal, and possibly give some tips on how simple journal keeping can really be. ^.~

Mini Album TJ Paper Bag Books

 Posted over from Pearllight Studio Trader Joes paper bag books
Hello everyone, hope your holiday season was a good one. Today I'm sharing with you the books I made the week before Christmas. All of them are made from Trader Joe's grocery bags.
The two above turned out to be my favorites. 

This project started from bunches of Trader Joe's holiday themed bags, all which I saved for the interesting tags and garland strips printed on them; but when I finished taking apart the bags, I had some leftover bag ends, so I got the interesting idea to try making another junk book, or in this case several junk books.

On the one book (left side in the above picture) I used some brown card stock from my scrapbook pile and used a roller stamp to make the pretty red flowers; then I cut the main label from one of the bags, and added some green garland at the top with marker pens. The inside has a total of two signatures made from the one side of the bags.

On the right is the mini album I made of bag ends, that's the second one I made after my first try on the grocery bag book (see below)
 In my opinion, this book came out cute. It was my first try in making a book out of paper bag ends, and it worked.  Adding the handles was a last minute idea, and I was very pleased with the cute results of a shopping bag/book. It's a one signature booklet with inner cover pockets.  

And here is the video for how I made the mini bag book displayed above. (Please excuse poor quality, this was my very first YouTube video). One day I may manage to create better instructions on how to make these.
From side view on my two holiday books, I used the garland strips that came on the bags as a decorative spine. These two were a little more complicated than the first book I made. 
In case you're wondering, I used the wiggly lined garland strip for the book on the right, because to me it looked like bacon. 
 For my holiday booklet, I used one of the tags to add interest to the inner cover. And as you can see, I used the back part of the bags that had instructions on how to use the garland strips and tags; which if folded into signatures makes very interesting pages to work on (See below).
 This is the middle of the book where the two signatures meet.
Last on the Trader Joe's book list is the inner cover of the (bacon book) as I call it. I just used handle parts to strengthen the edge, then wrapped the garland strip around around the cover. And to fill in the blank spot where the ends meet, I added a star that also came on the bag.